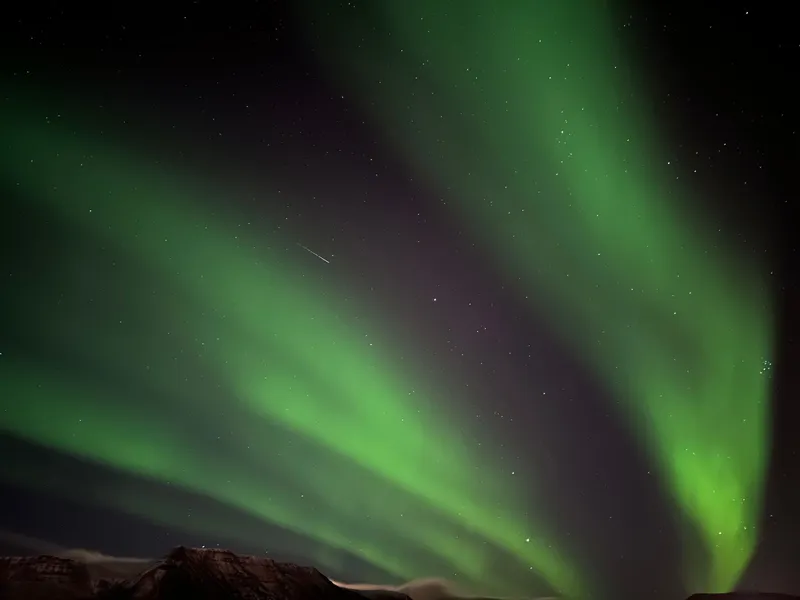
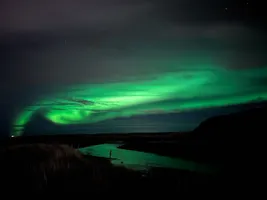
If you’re planning to photograph the Northern Lights with your iPhone, it’s important to manage expectations and know how to get the best results. I had the chance to do this myself, and while the iPhone isn’t the most professional tool for astrophotography, it’s definitely possible to get stunning shots with the right technique and some patience.
1. Find the Perfect Conditions
First, it’s all about location and timing. You need to be somewhere with minimal light pollution, like Iceland or northern Norway, and try to capture the Northern Lights on a clear, dark night between September and April. I found that using apps like Aurora Forecast or Aurora Alerts was a game-changer. These apps help you track the aurora’s activity and give notifications for the best time to head out and see the lights. If you’re in the right place at the right time, you’ll increase your chances of witnessing this breathtaking display.
Make sure that:
- You are in a dark place with minimal light pollution
- The sky is clear
- The aurora forecast is high
- Moon is not full and visible on the sky
- You have a good view of the northern horizon
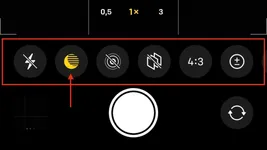
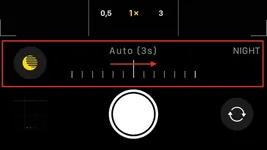
2. Maximize Your iPhone’s Low-Light Abilities
The iPhone can handle low-light situations better than you might expect, especially with newer models. Features like Night Mode come in handy, but you’ll still need to make a few manual tweaks for capturing the auroras.
- Turn off the flash: It’ll only interfere with your shot.
- Night Mode: This feature on newer iPhones automatically adjusts for low light by extending exposure time, which is crucial for aurora photography.
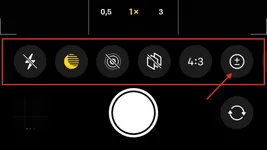
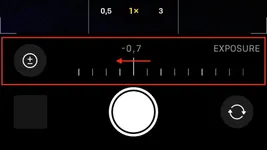
- Exposure: Tap and hold on the screen to lock focus, then slide to adjust the exposure. I often had to experiment with this a few times to get the right balance between light and dark without overexposing the shot.
If you have an older iPhone without Night Mode, apps like ProCam or NightCap let you manually adjust settings like shutter speed and ISO, which will help you capture better aurora images.


3. Stabilization is Key
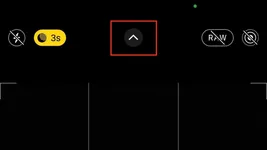
Since the Northern Lights require longer exposure times, keeping your iPhone steady is crucial. When I went out to photograph the aurora, I used a small, portable tripod, and it made all the difference. Even if you don’t have a tripod, you can stabilize your phone by propping it against a solid object like a rock. Don’t forget to set a self-timer to avoid even the tiniest shake when you press the shutter button. I usually set it to 3 seconds, which gives me enough time to let go of the phone and avoid any movement.
Most of the time, I put the phone on the car. If you do so, make sure that the car’s engine is not running because it will produce small vibrations that will ruin your shot. I learned this the hard way. :)
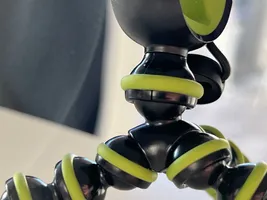
We use Joby tripod for our phones, and they’re lightweight, easy to carry, and perfect for keeping your phone steady in low-light conditions. They break often, but they are cheap and easy to replace.

4. Consider playing with Manual Settings
While Night Mode is great, sometimes you need more control over your iPhone’s camera settings to capture the Northern Lights. Here are some manual settings to consider:
- Exposure: Adjusting the exposure time can help you capture more light and detail in your shots. Longer exposure times will make the auroras appear brighter and more defined.
- Preserve previous settings: Your iPhone knows how to do that. This is especially helpful if you find a combination of settings that work well for capturing the Northern Lights.
For me, the best results came from a combination of Night Mode and manual settings. I’d start with Night Mode and then adjust the exposure time to get the perfect shot.

5. Watch Out for the Cold
If you’re photographing the Northern Lights, you’re likely in a cold environment, and the cold will drain your iPhone battery fast. I remember one night when my battery drained unexpectedly, so make sure to carry a portable charger. Also, keep your phone warm by storing it inside your coat pocket when you’re not using it. This simple trick helped me keep my phone alive for much longer out in the freezing night air.
We are using a portable charger from Asus, but any power bank will just do that. Previously we used for years a cheap one purchased from a local store in Japan it was working just fine. Here are some options for you to consider:
6. Editing Your Shots
Once you’ve taken your photos, editing will make a huge difference. Most of the time I just used the iPhone built-in editing tools, because I don’t like to over-edit my photos. It offers a range of options to enhance your photos, like adjusting exposure, contrast, and saturation. Here are some editing tips to consider:
- Increase saturation: The greens, purples, and reds of the Northern Lights can often be subtle in your raw image, so boosting the saturation will help.
- Reduce noise: Especially if you’ve had to use higher ISO settings, a bit of noise reduction will clean up your shots.
- Adjust contrast: This can help make the auroras highlight against the dark sky.
7. Practice and Patience
Photographing the Northern Lights can be unpredictable. You might not get the perfect shot right away, and that’s okay. It took me a few nights of practice and adjusting settings to capture the aurora the way I wanted to. Don’t get discouraged if your first attempt doesn’t go as planned—sometimes, just being present in the moment to witness the lights is worth more than any photo.
Final Thoughts
I learned a lot from photographing the Northern Lights with my iPhone, and while it’s not quite the same as using a DSLR, it’s entirely possible to get beautiful images with patience and the right settings. Embrace the process, experiment, and most importantly, enjoy the incredible show that nature puts on for you.
Now that you know more about the settings on your phone, you are closer to taking stunning photos of the Northern Lights with your phone camera. If you want to learn more about chasing the Aurora, make sure you take a look over the following article.
 Travelfoss
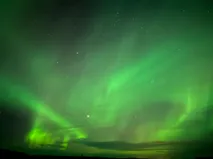
Last year, we’ve been following the Northern Lights for more than 20 consecutive days in Iceland and we learned a lot about how to predict when we might have higher chances of seeing an outstanding show in the sky. While most of it is a pure guess, when searching for the lights, there are small details that might help you head to the right location - many times it is just 5 kilometers away.
Travelfoss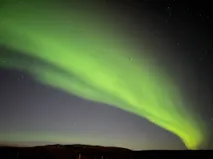
In the end, make sure that you keep yourself warm while going out to watch the spectacular Northern lights and have tons of fun!
Travelfoss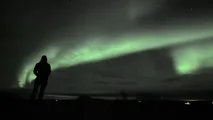
Related Travel Articles
- Northern Lights Forecast - Aurora Borealis
- How to Take Photos of the Northern Lights with Your Phone Camera - Aurora Borealis
- How To Stay Warm While Photo Shooting The Northern Lights - Aurora Borealis
- The Diary Of 24 Consecutive Days Of Northern Lights Chasing - Aurora Borealis
- Northern Lights Myth Busting - Aurora Borealis
- 7 Most Common Northern Lights Chasing Mistakes - Aurora Borealis
- How To Chase and Forecast The Northern Lights - Aurora Borealis
- How to Photo Shoot The Northern Lights With Your iPhone - Aurora Borealis
- 7 Unique Travel Destinations for 2024
Writing free, independent and personal travel content since 2021. If you appreciate what we do, then you can return the favor by using the affiliate links below.
- Get your accommodations on Booking.com
- Buy your gear and gadgets from Amazon
- Book flights using Expedia
- Book activities on Get Your Guide
- Book guided trips on G Adventures
Writing free, independent and personal travel content since 2021. If you appreciate what we do, then you can return the favor by using the affiliate links below with no cost for you.